The “Wi-Fi Doesn’t Have a Valid IP Configuration” error is a common issue on Windows 11, and here 7 ways you can fix it.
Isn’t it annoying when you’re all set to play multiplayer gaming, and suddenly, your computer system says you can’t connect to the Wi-Fi? If you have received a pop-up that says Wi-Fi Doesn’t Have a Valid IP Configuration or Ethernet Does Not Have a Valid IP Configuration on Windows 11, it’s game over for you and your multiplayer buddies. But only for a few minutes.
Luckily, we have found a few ways to fix the Wi-Fi Doesn’t Have a Valid IP Configuration error. The first thing you need to do is to restart your Wi-Fi router or computer system. Make sure to reset the Network Settings to see if that resolves the issue.
Besides these quick fixes, we have written a complete guide on how to fix the Wi-Fi Doesn’t Have a Valid IP Configuration error on Windows 11 by following 7 different methods.
Why Does the Wi-Fi Doesn’t Have a Valid IP Configuration Error Occur?
The most common reason Wi-Fi Doesn’t Have a Valid IP Configuration error appears on Windows 11 is the invalid IP address configuration. This error happens when the router’s IP address differs from the IP address recognized by the wireless network adapter. Now let’s discuss fixing the Wi-Fi Doesn’t Have a Valid IP Configuration error by following 7 step-by-step methods.
Fix #1: Restart Your Wi-Fi Router
The standard solution to every Wi-Fi-related issue, including the Wi-Fi Doesn’t Have a Valid IP Configuration error, would be restarting the Wi-Fi. This method gives a fresh start for your Wi-Fi router, and it is completely safe too. All you need to do is switch OFF the Wi-Fi and wait for a few minutes. Then switch it back ON and see if that has resolved the issue.
Fix #2: Set IP Address to Automatic
- Press the Win + R keys simultaneously to open the Run dialogue. Type in ncpa.cpl and click ‘OK’ to enter Network Connections.
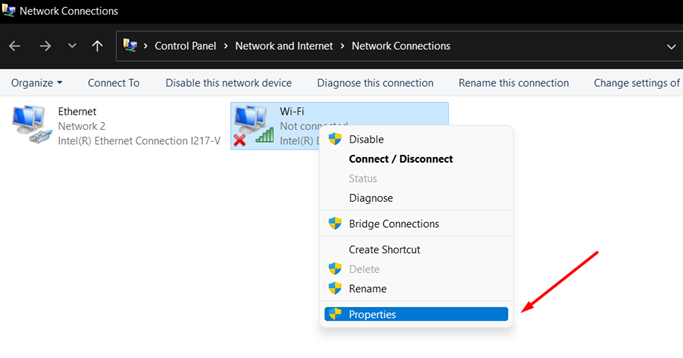
- Right-click on the Wi-Fi and select Properties. Ensure there is no red cross on the icon, indicating that your Wi-Fi is not showing up or not connected. Check your Wi-Fi router first to see if the internet is incoming from the ISP.
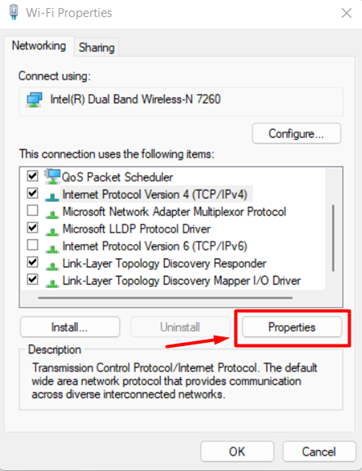
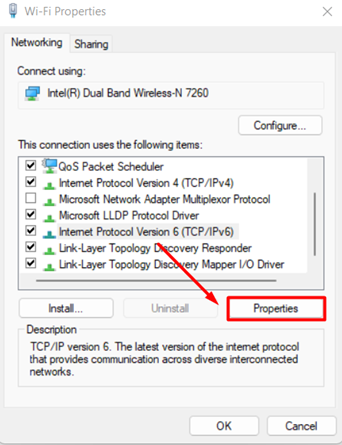
- Select the Internet Protocol Version 4 (TCP/IPv4) and click Properties.
- In the properties, ensure the values are selected as Obtain an IP address automatically and Obtain DNS server automatically.
- Select Internet Protocol Version 6 (TCP/IPv6) and click Properties.
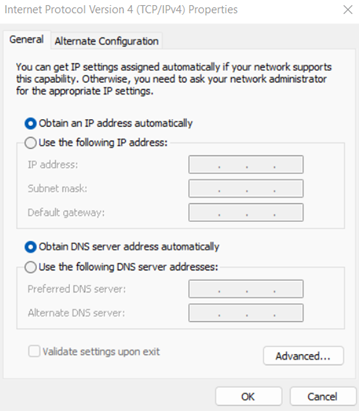
- Ensure the values are selected as Obtain an IP address automatically and Obtain DNS server automatically.
Fix #3: Restart WLAN Service
- Press the Win + S key to open the search bar and type Service. Press Enter to open Windows Services.
- Find and click on WLAN AutoConfig services.
- Select Restart to again run the service to see if that resolves the issue.
Fix #4: Renew Your IP Address
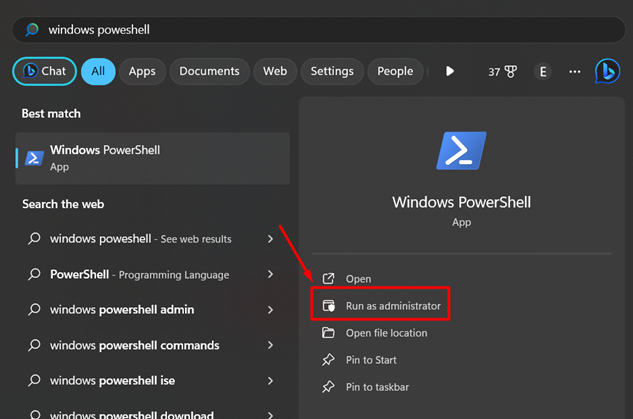
- Press the Win + S key to open the search panel and then type Windows PowerShell.
- Select ‘Run as Administrator’ to open the PowerShell.
- Run the following commands in the Windows PowerShell: ipconfig /release ipconfig /flushdns ipconfig /renew.
- After running these commands one at a time, restart your computer system and see if the Wi-Fi Doesn’t Have a Valid IP Configuration error still appears.
Fix #5: Reset the TCP/IP Network
- Right-click on the Desktop of your Windows 11 computer system and select Terminal.
- Run the following commands in the Terminal one after the other: netsh winsock reset netsh int ip reset.

- Then Restart your computer system to see if the Wi-Fi Doesn’t Have a Valid IP Configuration error still appears.
Fix #6: Update Drivers
Updating Wi-Fi drivers on Windows 11 can resolve the Wi-Fi Doesn’t Have a Valid IP Configuration error, and here is how you can do it.
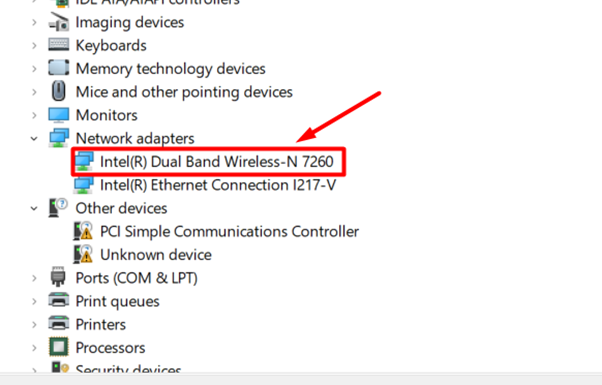
- Right-click on the Start Menu icon and select Device Manager.
- Click on the Network Adapters and then right-click on the one with ‘Wireless’ written next to its name.
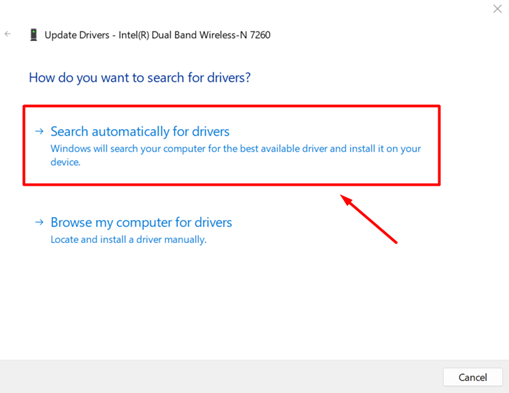
- From the right-click pop-up menu, select ‘Update Driver.’
- Then select ‘Search Automatically for drivers’ and wait until Windows downloads and installs Wi-Fi drivers automatically.
Fix #7: Reset Network Settings
- Open Settings from the Start Menu and go to Network & Internet.
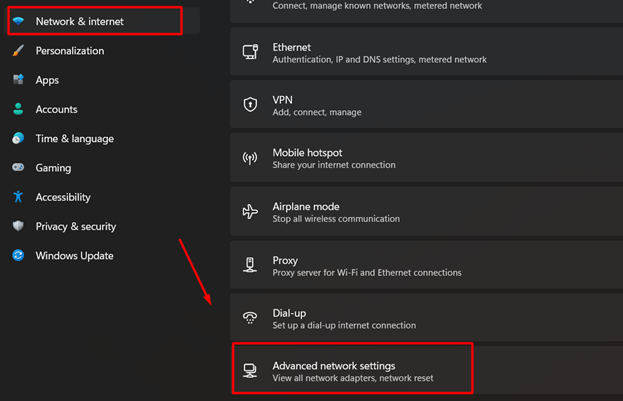
- Go to Advanced network settings > Network reset.
- Next to the Network reset, click the ‘Reset now’ button.
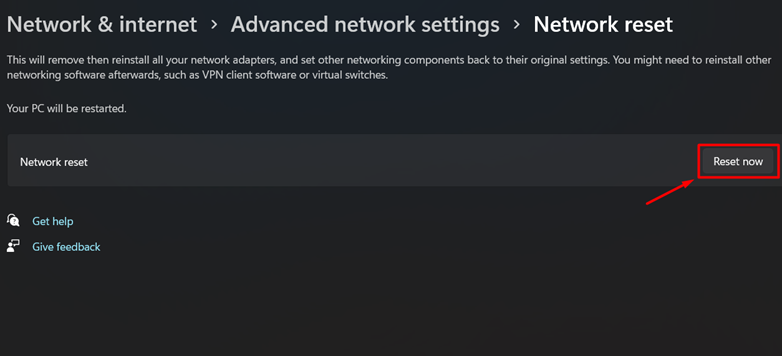
After resetting, your PC will restart, and all the network settings will be removed. You may have to re-enter the passwords for the Wi-Fi devices to connect with them.
Final Words
Not being able to access the internet even though you are connected to one can be the most frustrating moment for multiplayer gamers. Such a scenario can occur when errors like Wi-Fi Doesn’t Have a Valid IP Configuration appear. But with the methods mentioned in this article, you will surely be able to resolve this issue.