Minecraft port forwarding is a big deal for players to make the gameplay more exciting, and here is how to Port Forward Minecraft Server.
Minecraft is one of the most popular multiplayer and story-mode games. The new ray tracing concept in Minecraft has motivated players to build their own gaming PCs for Minecraft to enjoy a high-quality gaming experience. Now, you can share the building, blocking, and defending in Minecraft by port forwarding the server.
To port forward the Minecraft server for the Java edition, you must forward both TCP and UDP ports 2556. The requirements for the Minecraft Bedrock Edition server is different as you have to port forward UDP 19132 and TCP ports 19133.
But porting forward is not that simple, and you may have to make some preparations for it, too. In this article, we will explain how to port forward a Minecraft server by following a few easy steps. We will discuss the preparation and proceed to the server port forward method.
Preparing for Port Forward Minecraft Server on Windows 11
Here are a couple of steps you need to perform before port forwarding Minecraft Server on Windows 11.
Step #1: Find the IP Address of Your Router and Gaming PC
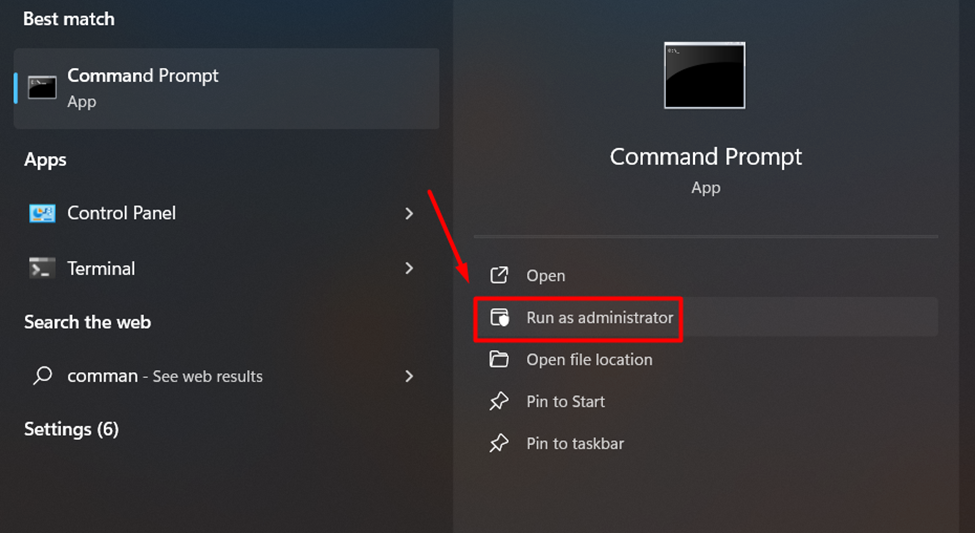
- Press the ‘Win +S’ keys simultaneously and search for Command Prompt. Select ‘Run as Administrator’ for the Command Prompt.
- Type ‘ipconfig’ in the Command Prompt and press the ‘Enter’ key.
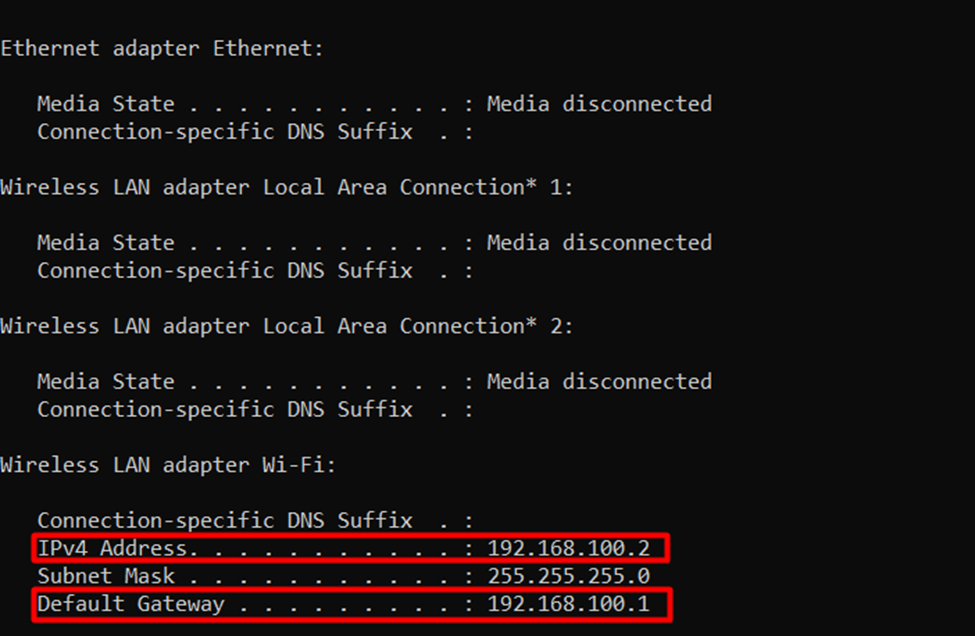
- From the generated information, find the IPV4 Address and Default Gateway address to note them down for entering later to port forward Minecraft Server.
Step #2: Check the TCP IP for Minecraft Port Forwarding
Now, you must check the Minecraft port forwarding requirements based on the TCP and UDP required. Here are some common TCP and UDP ports for port forwarding Minecraft.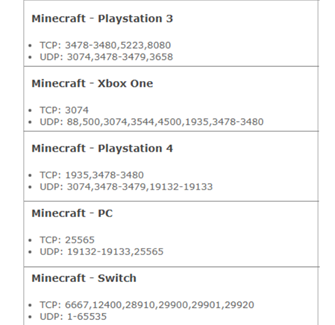
Once you have completed the above-mentioned steps, you can port forward Minecraft Server on Windows 11.
Port Forwarding Minecraft Server on Windows 11
Here are 3 different steps that you have to perform to port forward Minecraft.
Step #1: Login to the Router’s Page
- Open your web browser and type the IP address in the URL section we checked in Step #2 of preparation. For example, we are taking the router information we found, so we’ll enter 192.198.100.1, as shown in the image below, and press Enter key.
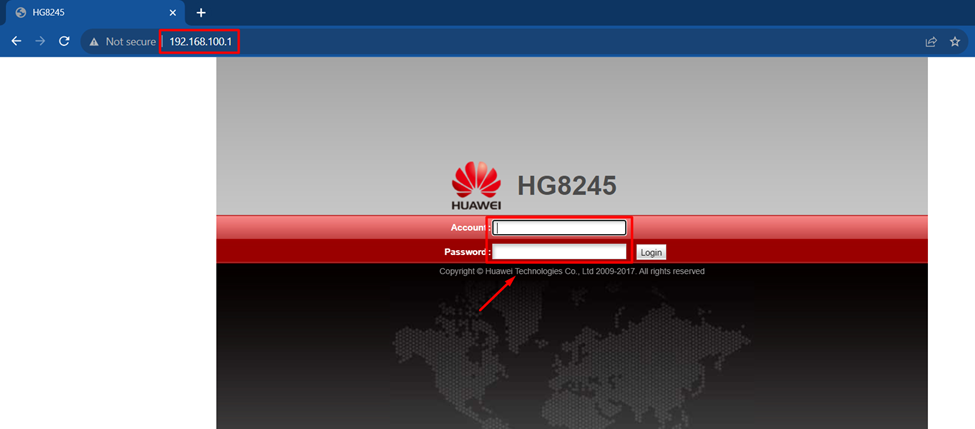
- Now, the login page for your internet router will appear. Enter the login and password for accessing the router’s control panel from the browser.
(Hint: If you don’t know your router’s credentials, check the back of your Wi-Fi router for login and password).
Step #2: Assigning Statis IP to Gaming PC
It’s essential to assign a static IP to your gaming PC from which you’ll be forwarding the Minecraft server to prevent the IP address from disconnecting. This way, you won’t have to update the IP address when you switch ON the gaming PC.
- Login to your internet router as done in the previous step.
- Find your computer IP address, which should be the same as the IPV4 address found in the preparation Step #1.
- Lock the IP address for your computer from which you will be forwarding the Minecraft server.
- Click the Settings or the gear icon and select Reserve written next to that address.
- Once the IP address is reserved, click the ‘Save’ button to apply the changes.
Keep in mind that the assigning static IP method might vary depending on the type of router or the manufacturer’s settings. You can always contact your internet service provider or check how to assign the static IP to your specific router online.
Step #3: Port Forwarding Minecraft Server
- Go to your router’s Homepage and find the Forwarding or Forward Rules tab. This option might be different on your router homepage screen.
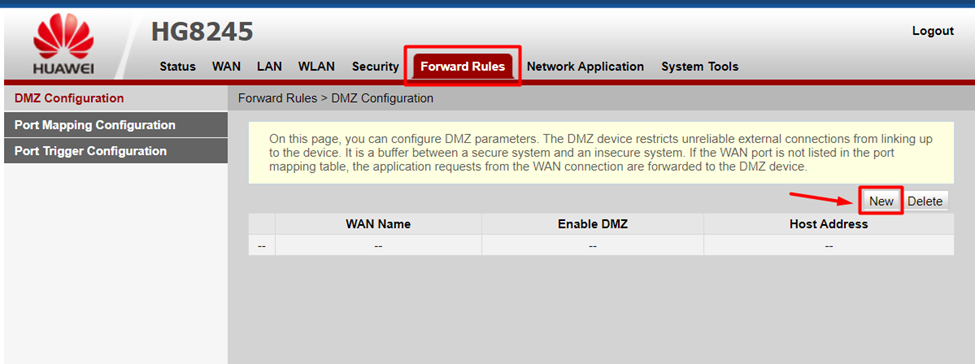
- Click the Add New or New button to add the Minecraft server details.
- Enter the name for the new IP rule as Minecraft. Type in the port number’ 25565′, and in the Inbound box, type the static IP address.
- Enter the static IP address and the Minecraft port number’ 25565′ in the Outbound box.
- Select the protocol as UDP or TCP per your requirement and set the status to Enabled.
- After entering all the above-mentioned details, click Save and restart your router to make the Minecraft server accessible.
Final Words
Port forwarding local Minecraft server lets you find new players and allows you to host more exciting gameplay for everyone. In this guide, we went through the complete process to port forward the Minecraft server on Windows 11. However, the method or steps could vary due to the name of options and settings categories allotted by the router manufacturer.