Connecting the power button to the motherboard is a critical step in building a PC. Yet, it’s also one of the most overlooked steps, even by experienced builders. This small but vital connection is what allows you to power on your PC, and if it’s not done correctly, it can cause issues such as an unresponsive PC or even damage your hardware.
In this DIY guide, we’ll walk you through the step-by-step process of connecting the power button to the motherboard for efficient PC startup. Whether you’re a beginner or an experienced builder, our guide will help you streamline your PC’s startup process and optimize its performance. Let’s get started!
What you need:
So, if you want to hook up a power button to your motherboard, you’ll need a few things.:
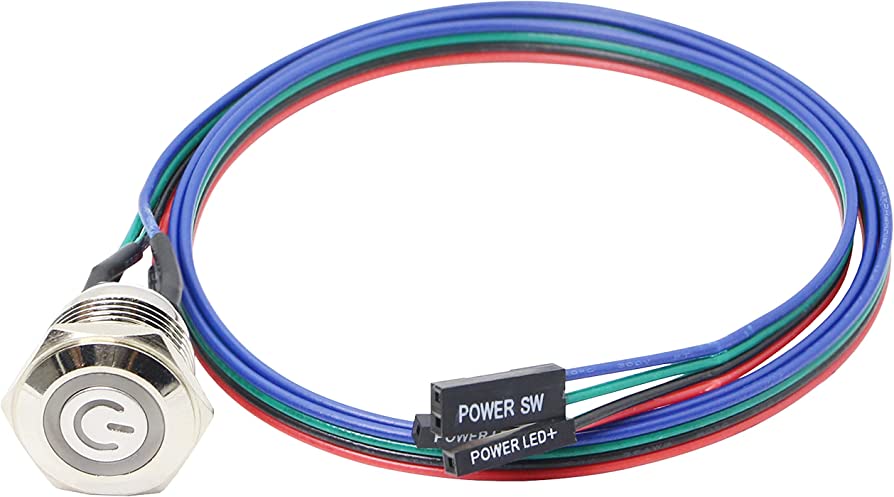
- Power Button Cable: You’ll need this to connect the power button to the motherboard. Look for the “PWR” or “PWR SW” label on your motherboard and connect the cable to the power switch pins.
- Motherboard: Make sure you’ve properly installed it in your case and unplugged it before you start.
- Screwdriver: Depending on your case, you might need this to remove the panel covering the motherboard.
Locating The Motherboard Power Switch Pins
- Locate Power Switch Pins: Before connecting the power button to the motherboard, make sure you know where the power switch pins are. Look for the “PWR” or “PWR SW” label on your motherboard.
- (Optional)Clean Motherboard: If you haven’t cleaned your motherboard in a while, now is a good time to do so.
- Remove Case Panel: To access the motherboard, you’ll need to remove the case panel covering it. This usually involves unscrewing a few screws.
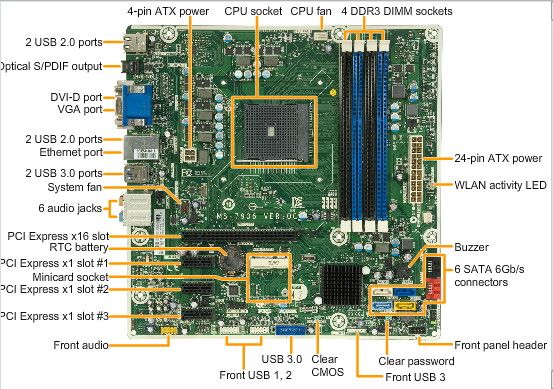
- Locate Motherboard: Once the panel is off, you’ll see the motherboard – it’s a big, flat circuit board with lots of connectors and components.
Locating Front Panel Header
Okay, now that you’ve found the motherboard, it’s time to find the front panel. There are two ways to do it, so let’s go over them:
1. Using the Motherboard Manual:
If you want to find the front header on the motherboard using the manual, here’s what you do:
1. Get the manual – you can find it in the stuff that came with the motherboard or search online using the make and model.
2. Find the section on the motherboard’s layout and connections – it should have a diagram with all the connectors and components labeled.
3. Look for the “front header” or “front panel header” label – it’s usually a small group of connectors near the front of the motherboard, with labels like “PWR,” “RESET,” “HDD LED,” and such.
2. Manually Search for Front Panel Header
If you don’t have the motherboard manual, you can still find the front panel header by doing this:
- First off, figure out which side of the motherboard is facing the inside of the computer case – that’s usually the front side where the front panel connectors (like the power button, USB ports, and audio jacks) are located.
- Look for a small group of connectors near the front of the motherboard. The front header should have labels like “PWR,” “RESET,” “HDD LED,” and stuff like that. Sometimes it’s called the “front panel header” or just the “front header.”
- If you’re still not sure, take a look at the connectors that are hooked up to the front panel buttons and indicators on your computer case – things like the power button, reset button, and hard drive activity LED.
- Once you’ve found the front header, you can match up the labels on the front panel cables from your case to figure out which connectors go where on the motherboard. Just make sure the labels on the cables line up with the matching connectors on the motherboard when you plug them in.
Identify Power Switch Pins
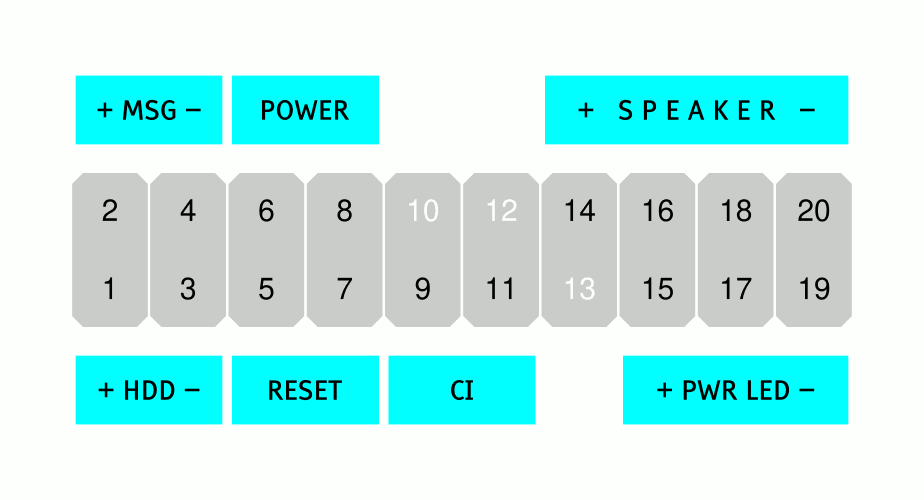
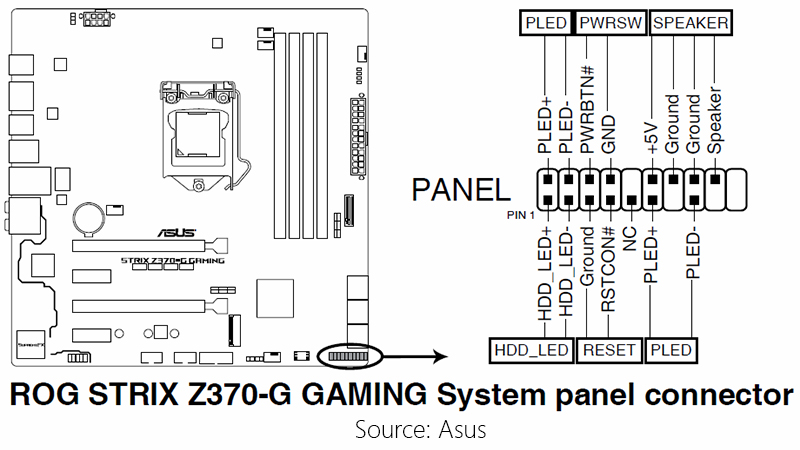
First, check the motherboard manual or manufacturer’s website to find the front panel header’s pinout. You should see a diagram or table that shows which pins do what, like the power switch, reset switch, and power LED.
Now search for the front panel header on the motherboard, and look for the power switch pins. They might be labeled as “PWR_SW” or something similar. You’ll typically see a positive and negative side to the power switch pins. The longer pin is usually the positive or “power” pin, while the shorter one is the negative or “ground” pin.
Verify The Pin Layout
Not all motherboards are created equal, so it’s important to make sure the power button cable you have matched up with the power switch pins on your motherboard. To confirm compatibility, you can either check the motherboard manual or test the continuity of the pins with a multimeter.
Mark The Pin Layout
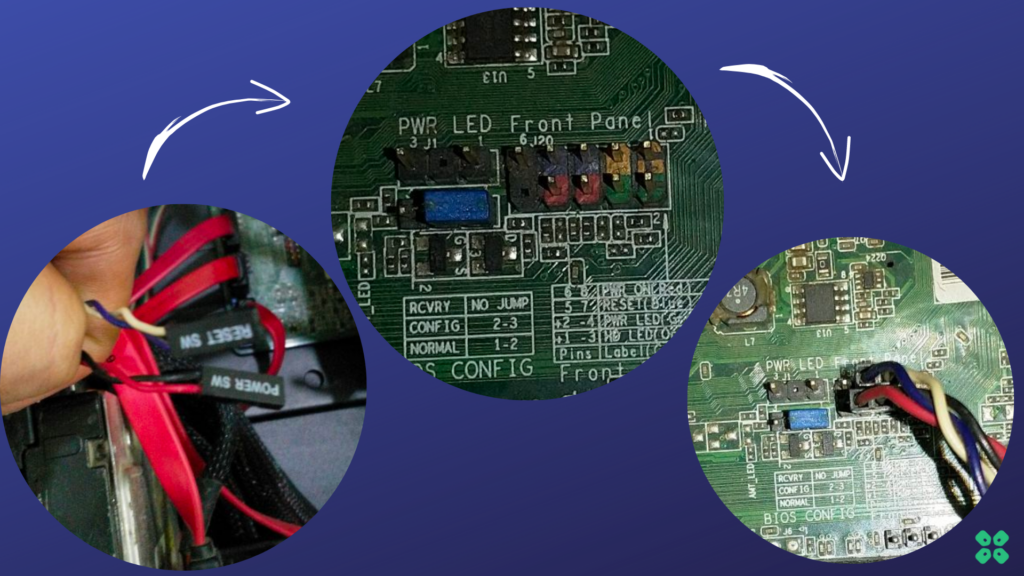
Make your life easier when connecting the power button cable by marking the pin layout on the cable with a permanent marker. This way, you can easily match the wires to the correct pins on the power switch.
You can also verify the pin layout by checking the motherboard manual or using a multimeter to test the continuity of the pins. Once you have confirmed the pin layout, simply connect the header and pins.
Testing And Troubleshooting The Connection
Testing Your Power Button Connection
Once you’ve hooked up the power button to your motherboard, it’s important to make sure it’s working properly. And hey, if you just got a brand-new storage device, don’t forget to take a look at our guide on how to connect an SSD to your motherboard.
- Get Your Case Back Together:
If you had to remove the case panel to access the motherboard, be sure to put it back on before you test the power button connection. - Power It Up:
Connect your power supply to the motherboard and plug it into an outlet. Then press that power button to get your computer going! If the button is doing its job, your computer should start right up. - Watch the Boot Sequence:
Keep an eye on your computer as it starts up – it should run through the normal boot process, including showing you the BIOS screen and loading up your operating system. If the power button isn’t working, though, you won’t get very far.
Troubleshooting Your Power Button
Let’s get to the bottom of why that power button isn’t working!
LED Check:
First things first, if your power button has an LED light, check to make sure it actually lights up when you press the button.
Manual Review:
If the button’s not working and you’re not sure why? Check out your motherboard manual. It should have some tips for troubleshooting common issues with the power button.
Connection Check:
If the LED is lighting up and the button’s still not working, double-check the connection to make sure the cable’s snugly attached to the power switch pins. Also, check for any damage or fraying on the cable itself. Make sure everything is connected the way it should be!
Try a Spare Button and Cable
If the original button and cable are still not working, give a spare button and cable a shot. If the spare button works, then you know you need to replace the original button. If the extra cable works, then you need a new cable. And if neither spare parts work, well, it might be time to call in some more serious tech support.
Wrap-up
Connecting a power button to your motherboard is a straightforward process that requires a few things. By following the steps we’ve outlined, you’ll be able to connect your power button in no time.
Remember, the key is to find those power switch pins on your motherboard, get your power button cable ready, and then make sure everything is securely connected.
Once everything is connected, don’t forget to test that power button to make sure it’s doing its job.
With the right tools and knowledge, hooking up your power button is a breeze. And once it’s connected, you’ll be able to fire up your computer and get to work.