Valorant players are currently experiencing frustratingly high ping issues while playing, which is significantly reducing their performance and resulting in frequent match losses.
As a result, the overall gaming experience for these players is being severely affected. Consequently, players are actively seeking ways to reduce the ping in Valorant to resolve this problem.
The occurrence of high ping in Valorant can be associated with various factors, but one effective way to prevent this problem is to ensure a stable internet connection.
Having an unstable internet connection not only leads to high ping issues but may also cause other network-related problems during gameplay.
Best Ways Lower Ping In Valorant
Lowering ping in Valorant requires a combination of optimizing your internet connection and making some adjustments to your game settings. Here are several steps you can take to try and achieve a lower ping:
- Use a Wired Connection: Use an Ethernet cable to connect your PC or gaming device directly to the router. Wired connections generally offer more stability and lower latency compared to Wi-Fi.
- Close Background Applications: Close any unnecessary applications running in the background, as they might be consuming bandwidth and causing latency issues.
- Check for Internet Congestion: If you’re experiencing high ping during specific times of the day, it might be due to internet congestion. Try playing during off-peak hours to see if the situation improves.
- Select the Right Server Region: In Valorant, you can manually select the server region you play on. Choose the server that is closer to your location for a better connection.
- Update Network Drivers: Ensure your network drivers are up to date. Visit the manufacturer’s website or use a reliable driver updater tool to keep them current.
- Restart Your Router: Sometimes, a simple router restart can help refresh the connection and improve your ping.
- Optimize Game Settings: Lower graphics settings and resolution in Valorant to reduce the workload on your system and potentially improve network performance.
Solution 1: Restart the Game to Reduce your Ping in Valorant
Whenever you encounter Valorant High Ping or any game bug, you should restart the game before trying any further solutions.
Restarting the game will eliminate any temporary error which is occurring due to the old cookies and cache or the system’s other software clashing with your gaming software.
All of these errors will be eradicated after a simple restart of the PC or any other platform you use and help you to Lower your Ping in Valorant.
If the error persists, switch to a reliable VPN below in solution 2.
Solution 2: Switch to a More Reliable VPN
If you are using a VPN extension in your web browser then it’s an issue. You have to disable all VPNs and prefer the desktop version VPNs which are reliable to use. And these premium VPNs are available on all devices.
Free VPN did not allow you to stream at full speed they set a limit to the free version which is not a very useful speed for working or playing Valorant. And at some point, you may get VAN 152 connection error which is triggered by a low-quality VPN.
For your convince, I am listing down some most reliable plus they are working with other users without having any High Ping issues or network lag in Valorant.


Solution 3: Close Unwanted Programs on PC
If there are too many programs running in the background, using too much internet can cause the Valorant Lower Ping issue on Windows 11.
Closing unwanted programs will help you eliminate the Ping issue and Valorant freezes issue on your PC.
So, let’s close unwanted programs:
- Press Ctrl + Shift + ESC keys to open Task Manager
- Now check which program is using more Network
- Right-click on that program and select End task
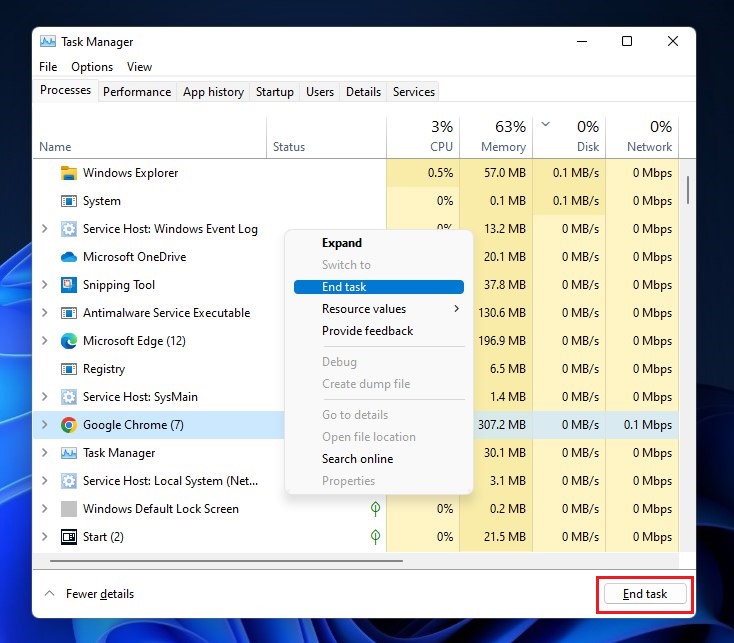
- And check if the crash is solved or not.
Solution 4: Improve WIFI Internet speed to Lower your Ping in Valorant
Your PC won’t connect to also occurs when the router is too far from your computer,
So, try bringing your router close to your PC, and will receive strong signals leading to a stable internet connection to get over network problems in valorant
And if you can’t do this then try buying a powerful router that will provide you with solid and broad signals around your house.
Solution 5: Switch to a Wired Connection
A wired connection is better for lower ping in Valorant due to its stability, reduced interference, lower latency, consistent bandwidth, and less packet loss. With higher data rates, Ethernet connections offer faster data transfer between the player’s device and the game server, resulting in a smoother and more responsive gaming experience.
Here is one of the Valorant players suggesting the same solution on Reddit:
Solution 6: Update WiFi Drivers on Windows 11 through Device Manager PC
WiFi drivers are an essential component of your computer’s network functionality. They allow your computer to connect to WiFi networks and enable smooth and uninterrupted internet access. If you’re experiencing connectivity issues or slow internet speeds, updating your WiFi drivers may help resolve the problem.
Here is how you can WiFi Drivers via Device manager:
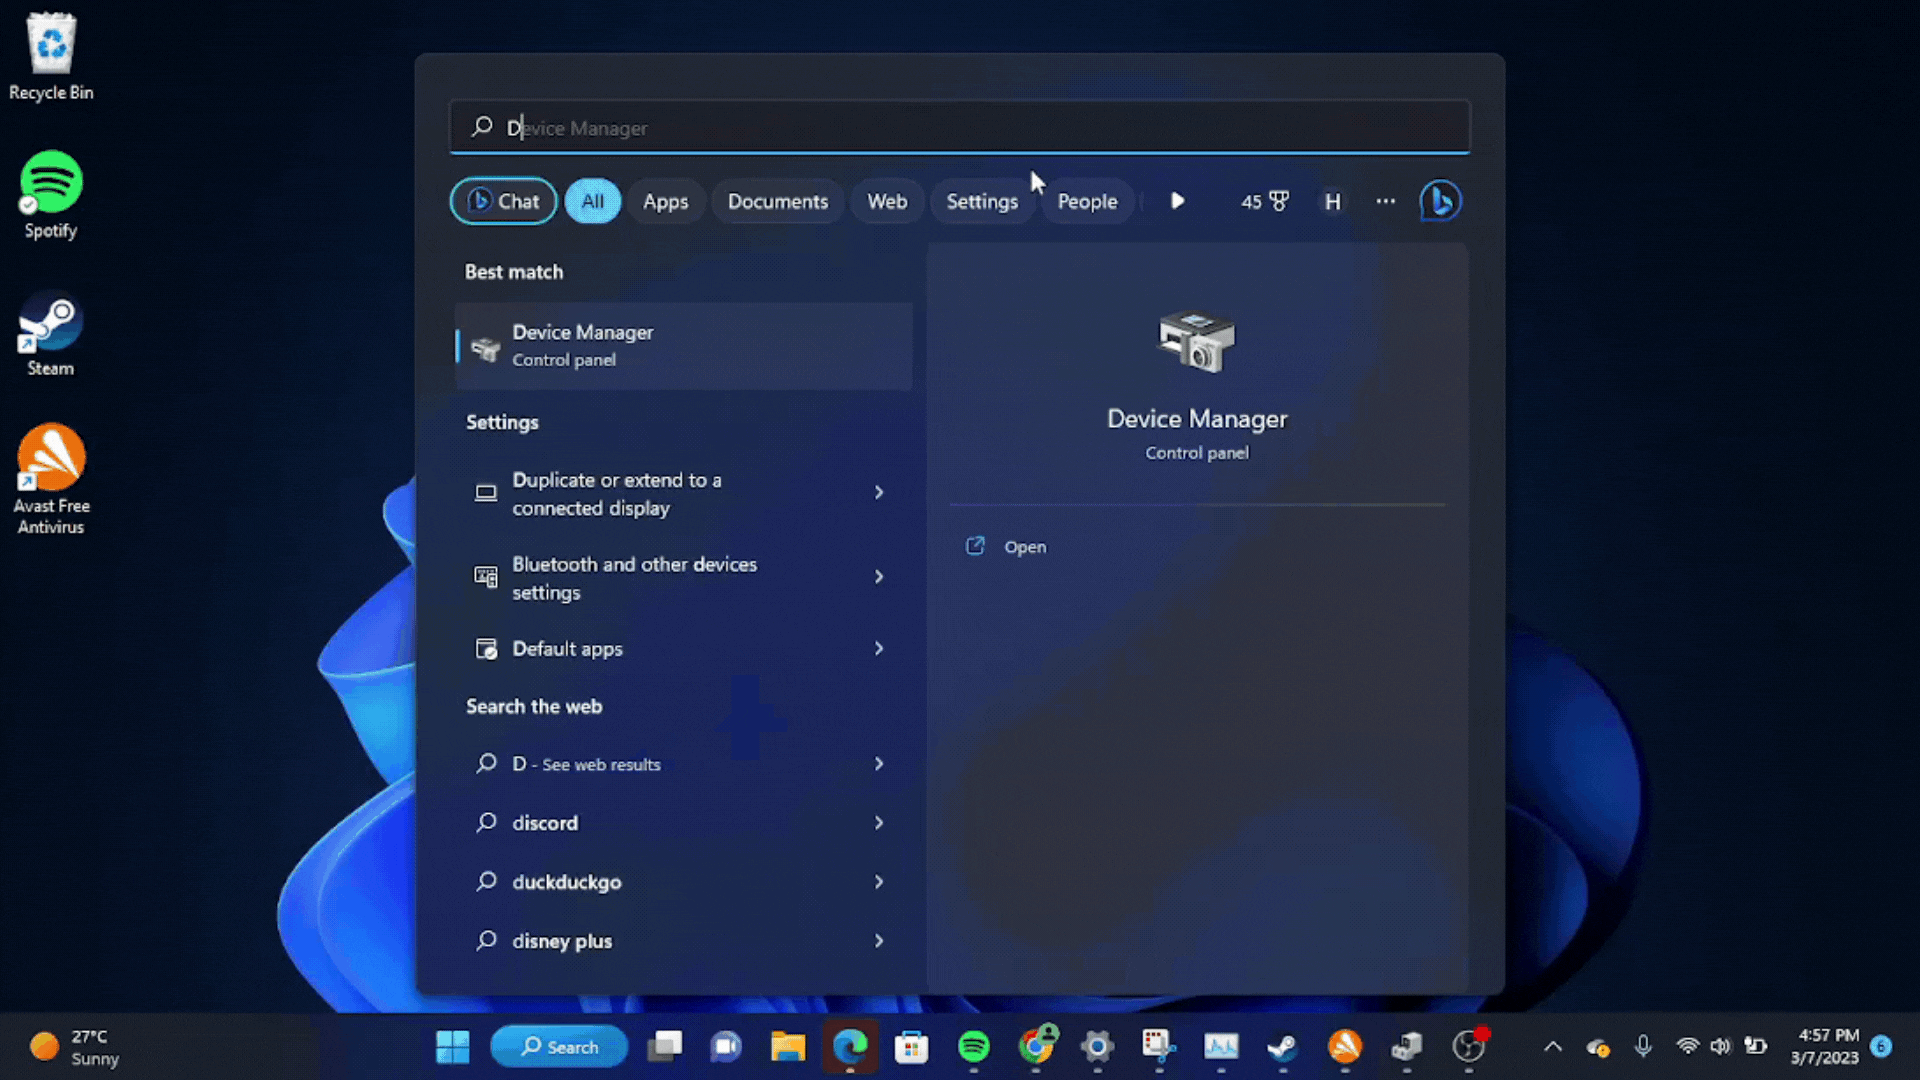
- Click on the Search icon
- Type Device Manager
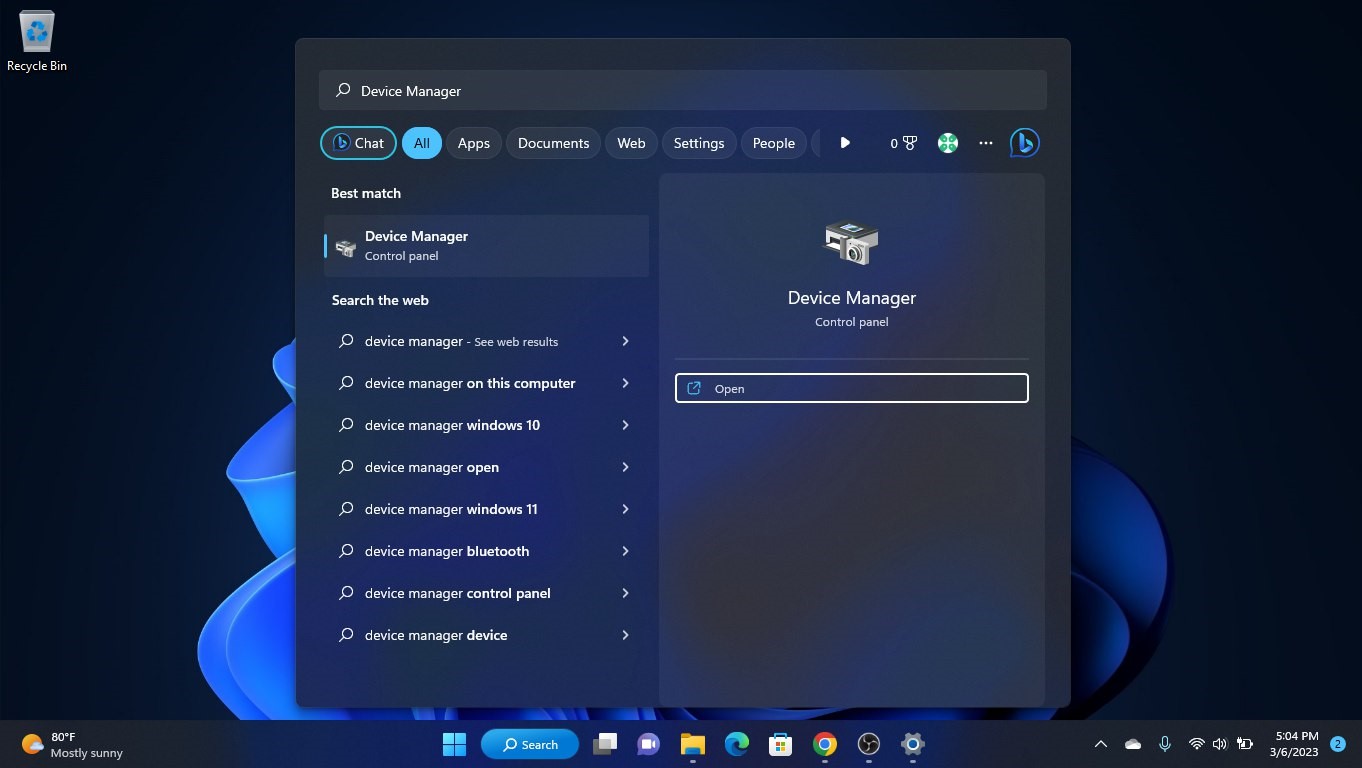
- Click to open Device Manager
- Then select the Network adapter
- Click right on the WiFi card name
- Click on the Update driver
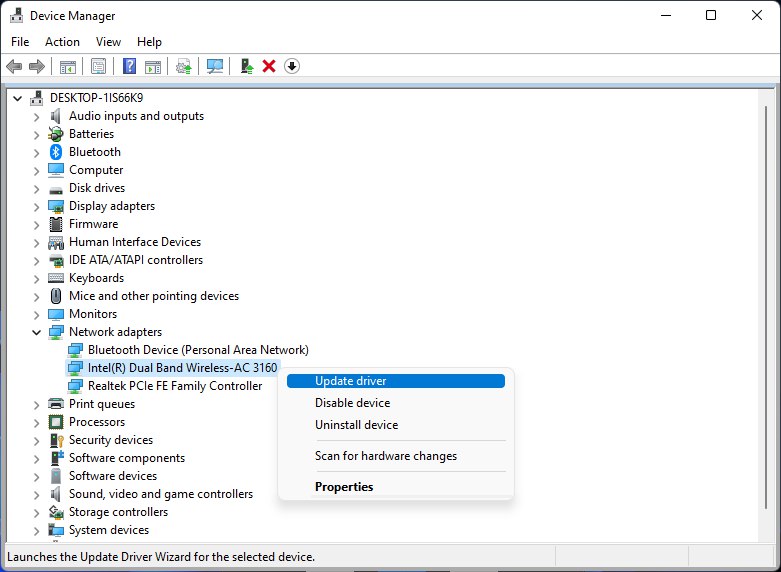
- Select “Search automatically for drivers“
Hope this will help you to upgrade the WiFi drivers and eliminate the low-speed problem
Solution 7: Clear DNS Cache and Data on PC
DNS translates website names into computer-readable IP addresses. Windows 11 stores DNS data to speed up website access, but this cache can become outdated or corrupted, causing issues.
Clearing the cache forces your computer to get the most recent data from DNS, fixing issues with website access or slow browsing. Follow the steps in this guide to clear the DNS cache on Windows 11.
How do I clear my DNS cache?
- Click on the Windows start icon in the bottom left corner.
- Then press the Windows key + R.
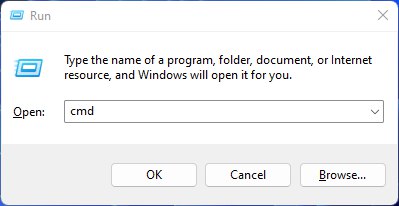
- The Run box will appear.
- Type cmd, and click on OK.
- Then on the cmd window, enter the following commands: (Note: Type the following commands, and hit Enter after every command)
- “ipconfig/flushdns”
- “ipconfig/registerdns”
- “ipconfig/release”
- “ipconfig/renew”
- Close the window.

Now after clearing the DNS Cache and Data, it’s time to set your DNS settings automatically on your PC/laptop to fix Lower Ping on PC while playing Valorant.
Solution 8: Setting your DNS to Automatic on Windows
To fix the Valorant ping issue we suggest setting your DNS automatically.
Here is you can set DNS on Automatic:
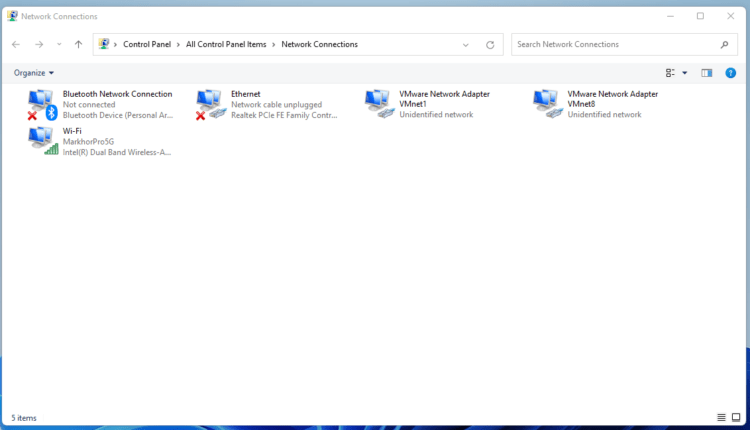
- Press Windows key + R.
- Then type ncpa.cpl and click OK.
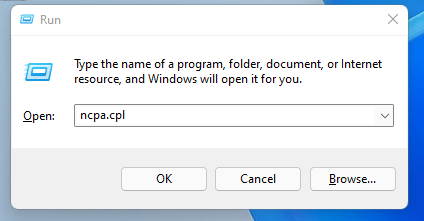
- In the internet connection, right-click on Ethernet and choose properties.
- In the properties window, choose Internet Protocol Version 4 (TCP/IPv4) or Internet Protocol Version 6 (TCP/IPv6)
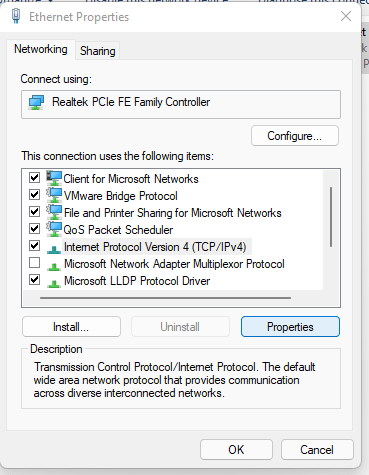
- Click the Properties button
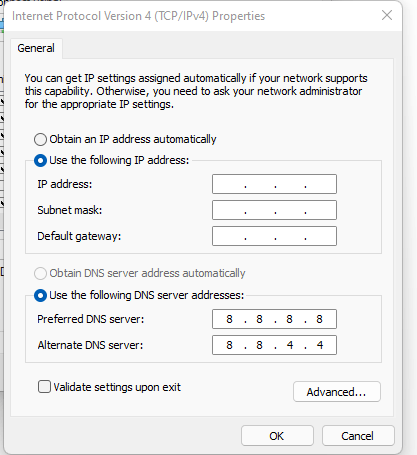
- Now choose the options “Obtain IP address automatically” and “Obtain DNS server automatically”
- Click OK.
If you already using the automatic DNS settings then you should try Google DNS manually
Solution 9: Use DNS manually or Google’s DNS
Here is how you can set Google’s DNS in Windows 11:
- Press Windows key + R.
- Then type ncpa.cpl and click OK.
- In an internet connection, right-click on Ethernet and choose properties.
- In the properties, the window chooses Internet Protocol Version 4 (TCP/IPv4) or Internet Protocol Version 6 (TCP/IPv6)
- Click the Properties button.
- Now write 8.8.8.8 in the box next to ‘Preferred DNS server
- And then write 8.8.4.4 next to the ‘Alternative DNS server
If you have any queries or suggestions, feel free to share your experience with us in the comments section down below or you can reach us on our social handles.
FAQs
How do I lower my ping in Valorant?
1. Restart the Valorant
2. Restart the PC
3. Restart the router
4. Update the drivers
5. Update the Windows/OS